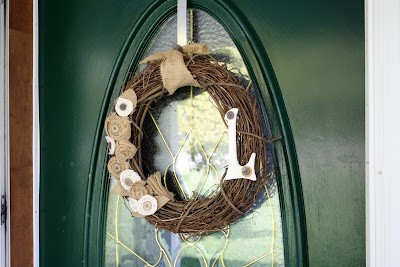
I have really enjoyed making different wreaths over the past year. I found my most current one a while ago on pinterest. The pin linked to an Etsy page where this very cute burlap wreath that would cost you $58 + shipping! I would never pay that for a wreath but I knew I could replicate it so I put it on my fall to do list. Here was my inspiration wreath.
My wreath cost:
1 yard burlap- $3.99/yard-- You wouldn't need a yard to make it but I wanted the extra burlap for another fall craft I'm planning. I also used a 40% off coupon at JoAnns.
1 18 inch grapevine wreath- $4.99--I was shocked at how cheap these are. I used a coupon on this as well.
Buttons- I already had these. Start cutting the buttons off old clothes your donating, etc. Buttons are expensive to buy.
Hot glue gun and glue
Needle and thread
Other fabric scraps- I used Muslin fabric, I like to keep this around to back different sewing projects so I had that as well.
So really my wreath cost almost nothing. I have made lots fabric flowers since my addiction to those started at Hadelyn's baby shower where we all made headbands. Really it is easier to make flowers with cottons and knits so I was able to kinda use the same idea to fudge these burlap flowers. So if you are going to try it and haven't made flowers before look up a tutorial. I didn't take pictures throughout the process so really this isnt a tutorial. Just a how to.
My method is twisting the fabric or burlap however tightly you like, then using hot glue glue as you wrap the burlap to make it into the flower shape. They will not look perfect which is part of the look with burlap anyway. You can cover glue dots with buttons. Just make as many or as few as you'd like. Add buttons, leaves, other flowers, whatever you like. I decided to add the wooden letter to personalize it. It would also be very cute with your house number on it, but I couldn't find numbers that were small enough.
So once you make your flowers just set them up where you like them and begin gluing them to your wreath. I added my wooden letter, then decided I'd like buttons on my letter as well. I cut a thick piece of burlap to use at the top of my wreath, you could also use ribbon, twine, or other fabric scraps.
I hope that helps if you were curious how I did it! Here are some better pictures of my finished product.


This is lovely! I think the color scheme is like a nest with eggs in it. Great job Mama Roo!
ReplyDeleteThis is lovely! I think the color scheme is like a nest with eggs in it. Great job Mama Roo!
ReplyDelete